Move Lightroom photos to larger drive
Here’s my current process for moving my Lightroom library of photos, including the catalogue, from a drive that is almost full to a larger, empty one.
-
Purchase a new disk at least twice the size of the prior one, then erase and format it with a new name such as
YYYY-MM-DD-Your-Name-Photosusing Disk Utility. -
On the existing disk that is almost full, make sure file permissions are correct that that there are no locked files inside the Lightroom catalogue folder, in my case, called Photos, by opening a Terminal window and typing the following command:
sudo chown -R YourUserName /path/to/PhotosThis unlocks all files in the folder and all its subfolders and makes you their owner, good to do so the copy operation doesn’t fail half-way through when it finds a locked file.
-
Copy the
Photosfolder from the existing disk that’s almost full to the new emptyYYYY-MM-DD-Your-Name-Photosdisk. I just drag and drop using two Finder windows.You may have a long wait if you catalogue is large, so be prepared to leave it running overnight if needed and make sure to turn off any automatic sleep features on your computer.
-
Double click the Lightroom catalogue in the new
YYYY-MM-DD-Your-Name-Photosdisk to open it. Done!
Want to free more space in the new disk?
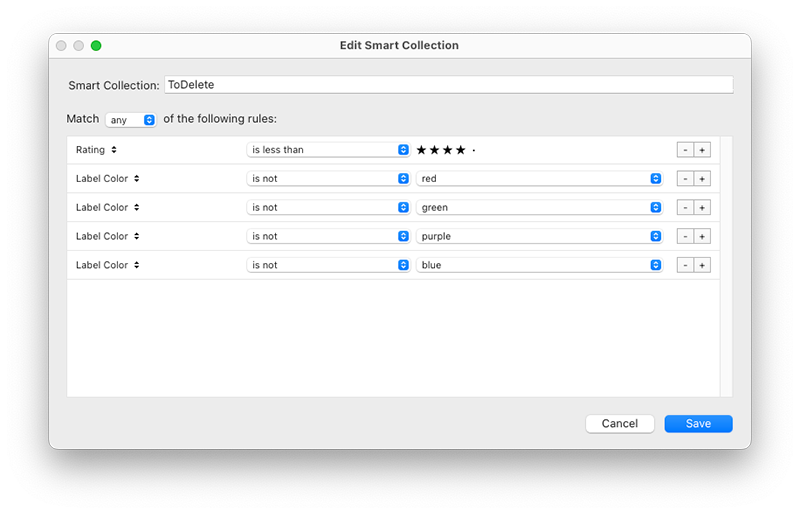
If you’ve been choosing your best and have a photography workflow, make a Lightroom smart collection called To Delete that matches any of the following settings:
- Rating is less than ★★★★
- Label color is not red (good photo)
- Label color is not green (published)
- Label color is not purple (published)
- Label color is not blue (person I know personally or person I promised to send the photo to)
Select all the images in the smart collection and press x on your keyboard to mark them as rejected. Click All Photographs on the top of the sidebar and then, on the top menu: Photo → Delete Rejected Photos.
· ˖ ✦ . ˳
Come with me in creative journeys through music and play by subscribing to my YouTube and Twitch channels. ❤︎ Did you enjoy this post? You can buy me a moment of time.
Possibly Related:
˳ · ˖
Prior entry: Let Readers Read
Next entry: Metagaming