Painting airplanes in Microsoft Flight Simulator 2020
Here’s how to roughly paint airplanes, also know as creating a “skin” or “livery”, in Microsoft Flight Simulator 2020 (MSFS), as seen on this video.
We’ll be painting a pizza on a wing of one of the default airplanes in the sim by directly painting its 2D texture files.
You can do it with more detail using 3D software like Blender and documentation from MSFS developers, including level of detail at different distances (LOD), and surface detail and decals, but we’ll stick with the quick “old fashioned” way here.
Lets go!
A. Copy Existing Livery from Official to Community Folder
Find the folder with files for the airplane we’re painting inside our MSFS installation folder, and copy it to the Community folder.
We’ll use the standard Cessna C172 equipped with Garmin G1000.
In the Steam version of MSFS, in our case installed on a separate SSD, we’ll make a copy of the C172 G1000 from the Official folder at:
D:\MSFS\Official\Steam\asobo-aircraft-c172sp-as1000-livery-aviators
…to the Community folder at:
D:\MSFS\Community\asobo-aircraft-c172sp-as1000-livery-aviators
Remember to never edit or move anything in the Official folder. Only copy folders from there, and then change things in the Community folder.
This way things won’t break in the simulator when we make mistakes or Microsoft updates MSFS, and we will avoid jumping up and down with computer rage.
From this point on note all paths below begin with
D:\MSFS\Community\
B. Edit Text in Folder Names

In our newly copied folder in the Community folder, right-click on the following folders, select Rename, and change text as follows:
asobo-aircraft-c172sp-as1000-livery-aviators
…to…
asobo-aircraft-c172sp-as1000-livery-pizza
asobo-aircraft-c172sp-as1000-livery-pizza\SimObjects\Airplanes\Asobo_C172SP_AS1000_LiveryAviators
…to…
asobo-aircraft-c172sp-as10000-livery-pizza\SimObjects\Airplanes\Asobo_C172SP_AS1000_LiveryPizza
In the the folders inside
asobo-aircraft-c172sp-as1000-livery-pizza\SimObjects\Airplanes\Asobo_C172SP_AS1000_LiveryPizza\, rename the folders:
model.aviators
…to…
model.pizza
panel.aviators
…to…
panel.pizza
TEXTURE.AVIATORS
…to…
TEXTURE.PIZZA
C. Edit Text in Text Files
Open the aircraft.cfg file at asobo-aircraft-c172sp-as1000-livery-pizza\SimObjects\Airplanes\Asobo_C172SP_AS1000_LiveryPizza\aircraft.cfg using a text editor like Notepad++ and change the following text:
title = "Cessna Skyhawk 172Sp G1000 Aviators Club Livery"
…to…
title = "Cessna Skyhawk 172Sp G1000 Pizza"
model = "aviators"
…to…
model = "pizza"
panel = "aviators"
…to…
panel = "pizza"
texture = "aviators"
…to…
texture = "pizza"
ui_variation = "TT:AIRCRAFT.LIVERY.AVIATORSCLUB"
to
ui_variation = "Pizza"
atc_id = "ASXGSA"
to
atc_id = "PIZZA"
Then save the file.
Open the manifest.json file at asobo-aircraft-c172sp-as1000-livery-pizza\manifest.json and change the following text:
"title": "Cessna 172 Skyhawk (G1000) - Aviators Club",
to:
"title": "Cessna 172 Skyhawk (G1000) - Pizza",
"creator": Asobo Studio",
to:
"creator": Our_Own_Name",
Save the file and go for a walk outside or do some exercise for a break from the screen and to prepare for wanting to eat a lot of pizza.
D. Edit Graphic Files

Time to paint some pizzas on our airplane. For this tutorial we will paint a pizza on the top of a wing of our C172. To do this we will edit the file called C172SP_AIRFRAME_WINGS_ALBD.PNG at asobo-aircraft-c172sp-as1000-livery-pizza\SimObjects\Airplanes\Asobo_C172SP_AS1000_LiveryPizza\texture.pizza\C172SP_AIRFRAME_WINGS_ALBD.PNG
Here’s how:
- Visit https://www.photopea.com/, a Photoshop clone, in a web browser, or use Photoshop if you have it.
- Drag-and-drop the C172SP_AIRFRAME_WINGS_ALBD.PNG file onto the Photopea browser window.
- Edit the file to paint or place photos of pizzas at the following position (thank you, Icebird4all!). 1
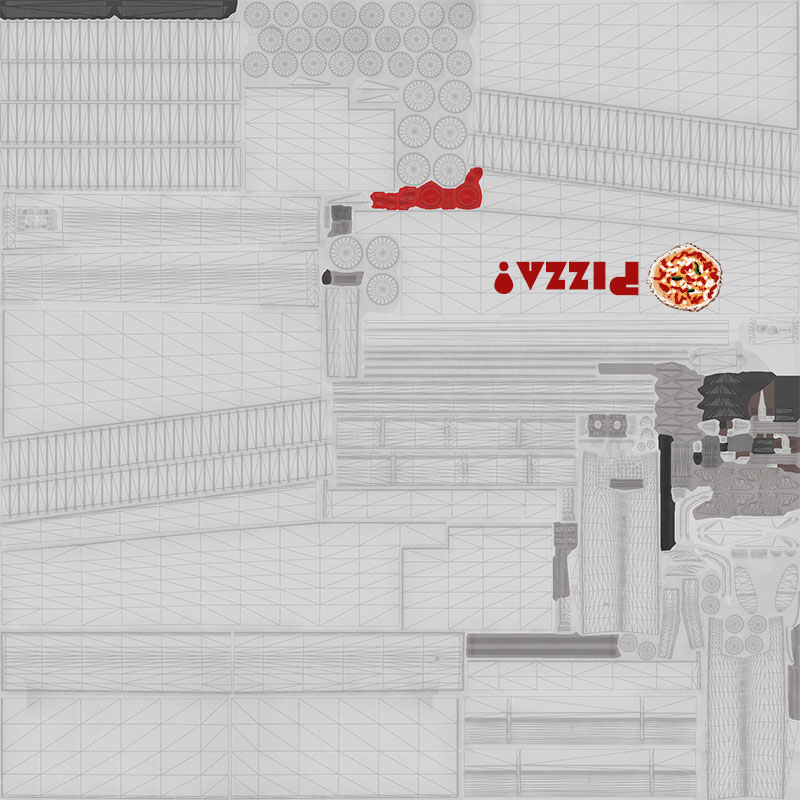
- Save our masterwork with all its layers for future tweaking by selecting File > Save as PSD in Photopea, and move this file somewhere like
D:\Liveries\MSFS\C172-1000\. - Save our capolavoro in DirectDraw Surface (DDS) format by selecting in Photopea: File > Export as > More > DDS , then click Save (leaving all the settings at default) and Save File so it is downloaded into our Downloads folder. Nota bene: If you are adding particularly detailed artwork to the plane, in order for it not to look pixelated in-game you can double the DDS export resolution to 4096×4096.
- Rename the original file from:
asobo-aircraft-c172sp-as1000-livery-pizza\SimObjects\Airplanes\Asobo_C172SP_AS1000_LiveryPizza\texture.pizza\C172SP_AIRFRAME_WINGS_ALBD.PNG
…to:C172SP_AIRFRAME_WINGS_ALBD-original.PNG
…and move it toD:\Liveries\MSFS\C172-1000\so we have a backup copy, then drag-and-drop or copy-and-paste our newly-downloaded C172SP_AIRFRAME_WINGS_ALBD.PNG to theasobo-aircraft-c172sp-as1000-livery-pizza\SimObjects\Airplanes\Asobo_C172SP_AS1000_LiveryPizza\texture.pizza\folder.
E. Computer, Edit One More Text File For Us

Finally, we’ll edit one more text file called layout.json, which is a sort of checklist for MSFS to know where the livery texture files are, how large they are, and so on.
We need to edit this file every time we update our painting, and this is tedious, so lets have the computer do it for us by using MSFS Layout Generator:
Go here and click on MSFSLayoutGenerator.exe to download it to our computer. Move it from our Downloads folder to somewhere where we will find it again whenever we wish, like D:\Liveries\MSFS\MSFSLayoutGenerator.exe
Drag-and-drop the layout.json file at D:\MSFS\Community\asobo-aircraft-c172sp-as1000-livery-pizza\layout.json onto the MSFSLayoutGenerator.exe file. We will see a command prompt window appear and disappear quickly. BOOM! Our layout.json file has been edited for us by the computer, adding pizza text and file size information in all the right places. 2

Start MSFS and go to:
- World Map
- Aircraft Selection → Cessna 172 G1000
- Liveries → Pizza livery
…and go fly!
Did it work? Come visit my Twitch channel and tell me, and click on the Follow button if you like what you find!
Found mistakes? Please let me know!
A presto!
Simon
Post Scriptum
Microsoft Flight Simulator 2020 uses a Physically Based Rendering (PBR) graphics texturing approach, using several texture files for a realistic look.
I asked Gemini AI to summarize the details about the different files and checked what it said. It seemed correct, so I added links to more information so you can check for yourself that it’s not spewing AI slop, and put the information here:
☀️ MSFS Texture Files Information
DDS (DirectDraw Surface)
DirectDraw Surface (DDS) is a container format developed by Microsoft for storing textures used in games and other applications. It offers several advantages over standard image formats like JPG or PNG:
- Compression: DDS files can use various S3 Texture Compression (S3TC) algorithms to significantly reduce file size compared to uncompressed formats. This is crucial for maintaining performance in games like MSFS2020 with its high-resolution textures.
- Mipmaps: DDS files can store mipmaps, which are pre-scaled versions of the texture used for rendering at different distances. This improves rendering efficiency by using the appropriate level of detail depending on how far away the texture is from the viewpoint.
- Advanced Features: DDS supports various pixel formats and features beyond basic color information. These can include information about transparency, normal mapping, and lighting properties.
While DDS offers these benefits, it’s not the most user-friendly format for direct editing. Here’s a breakdown of its use in MSFS2020:
- MSFS2020 and DDS: The game primarily uses DDS textures internally. However, you won’t typically need to edit them directly for creating a custom paint job. The game uses the textures provided by the aircraft model and applies them during rendering.
- Editing for Custom Liveries: If you’re editing textures for a custom livery, you’ll likely be working with the source files provided by the mod developer (if available). These source files might be in standard formats like PNG that you can edit with image editing software. The edited textures might then be converted into DDS format using specific tools provided by the developer or third-party tools.
Here are some additional points to consider:
- DDS Converter Tools: If you need to convert image files to DDS format, there are various free and paid tools available. Some popular options include Nvidia’s DDS plugin for Photoshop and https://flightsim.to/file/27707/msfs-textures-toolbox.
- Importance of DDS for Performance: While you might not directly edit DDS files for liveries, understanding their role in texture compression and mipmaps is important. They contribute significantly to maintaining smooth performance in MSFS2020 with its high-quality textures.
In summary, DDS is an important format for textures in MSFS2020, but you’ll likely be working with source files in other formats for creating custom liveries. If you need to convert or edit DDS files, there are tools available, but understanding them might require some additional research.
Albedo Map
This texture defines the base color of the surface, like the overall paint color of your airplane. Imagine it as a colored layer that acts as the foundation for the final look.
It’s a standard image file format like JPG or PNG. You’ll use image editing software to paint your custom design on this texture.
In MSFS 2020, the albedo map usually has a white background by default, with areas painted black representing completely transparent areas.
Normal Map
This texture doesn’t directly affect color but adds details like bumps, rivets, and wrinkles to the surface without increasing the polygon count (3D model complexity).
It’s a grayscale image where lighter areas represent bumps and darker areas represent indentations.
You typically won’t edit the normal map for a repaint as it defines the underlying physical details of the aircraft model, and modifying it can cause visual artifacts.
Composite Map
This texture combines several lighting properties into a single image file to improve rendering efficiency.
It typically combines:
- Ambient Occlusion: This defines areas where shadows appear due to nearby objects blocking light. In the image, darker areas represent deeper shadows.
- Roughness: This controls how reflective the surface is. A perfectly smooth surface will have a high roughness value (white in the image), while a rough surface will have a lower roughness value (darker in the image).
- Metalness: This defines how metallic the surface is. A value of 1 (white) represents a perfectly reflective metal surface, while a value of 0 (black) represents a non-metallic surface like painted wood.
Editing the composite map allows you to adjust these properties for your custom paint job. For example, you might want to increase the metalness value for a chrome painted surface or adjust the roughness for a flat or glossy finish.
-
There is a paintkit containing a file template with a “UV Map” guide to help you see what appears where on the Cessna 172 skin available at flightsim.to. ↩︎
-
Power tip shared by WildCraze: a. Find MSFSLayoutGenerator.exe in File Explorer. b. Right click → Create Shortcut c. Navigate to special folder shell:sendto via address bar and drag-and-drop or cut-and-paste the above shortcut inside. d. Rename the shortcut to MSFS Layout Generator. e. Right click any layout.json file → Send to → MSFS Layout Generator ↩︎
· ˖ ✦ . ˳
Come with me in creative journeys through music and play by subscribing to my YouTube and Twitch channels. ❤︎ Did you enjoy this post? You can buy me a moment of time.
Possibly Related:
- Skin Templates for IL-2 Sturmovik: Great Battles
- C172 G1000 Float Variant Microsoft Flight Simulator Livery Help
- MSFS 2024 wishlist for 2026
- On Exactitude in Science
- Fly to any GPS coordinates in Microsoft Flight Simulator 2020
˳ · ˖
Prior entry: C172 G1000 Float Variant Microsoft Flight Simulator Livery Help
Next entry: BN-2 Islander Update 1.2 is Out for MSFS
