Antistasi Amazons
Your island holiday with a group of creative writing teachers and a few ex-special forces operators is cut short by sudden hostilities between two politicians who managed to become the leaders of soldier men willing to kill for them.
Most civilians have fled, and seeing the risk of a spark setting the rest of the planet on fire you decide to stay and help the remaining local population.
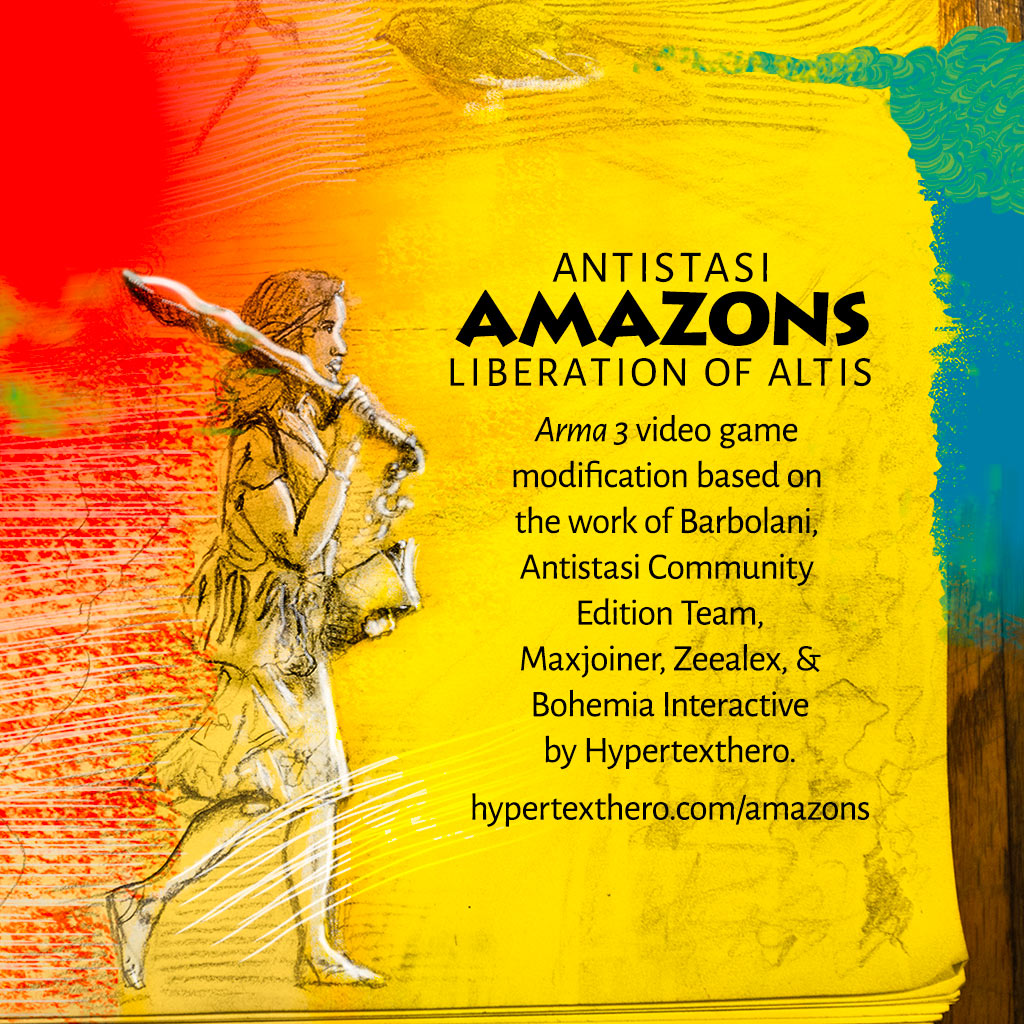
This is Antistasi Amazons, a basic modification (mod) of a dynamic long-term “Capture The Island” mission called Antistasi for the video game landscape orienteering and combat simulator Arma 3. Antistasi was originally made by Barbolani and is now an open source community-developed project.
Features
- Uses two player-made mods to add women to the game (the guerrillas you fight with), and lets you use a woman avatar.
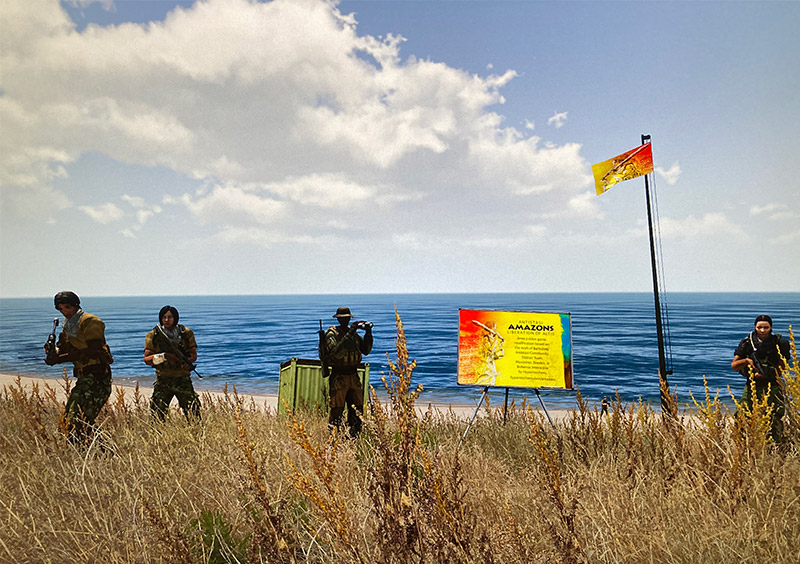
- Adds a new rebel flag, introduction card, and map board card with the above illustration.
- Adds new briefing and overview text.
- Disables Arma’s annoying stamina mechanic.
- Adds a basic rifle and scope and removes one submachine gun from starting weapons.
- Uses standard Arma 3 assets and its default Altis island map, a digital version of Lemnos.
- Sets saner mission parameter defaults to allow fast travel, reduce the number of weapons required for infinite unlocks to 10, and make enemy supply crate contents random.
You can play Antistasi Amazons alone or with friends.
Here’s how.
Downloads
- Buy Arma 3 from Steam and install the game. You only need the basic version to play Antistasi Amazons.
- Click the Subscribe button on the following Steam Workshop pages:
Steam will begin downloading the mods and you can see progress by clicking Downloads on the bottom of the screen.
- Download Antistasi Amazons from its GitHub page then double-click antistasi-amazons-main.zip to open the archive. Note: If you want to play one of the regular Antistasi missions instead of Antistasi Amazons you can follow these same instructions using a file like Antistasi-Altis-2-2-1.Altis.pbo from the Community Edition’s releases page, and ignore the FEMAL3_Heads and Max_Women mod loading bits.
Singleplayer
- Move the
Antistasi-Altis-Amazons.Altisfolder into your Arma 3 installation’smpmissionsfolder. Example locations:C:\Users\your_pc_username\Documents\Arma 3\mpmissionsC:\Users\your_pc_username\Documents\Arma 3 - Other Profiles\YourArma3ProfileName\mpmissions
- Launch Arma 3 from Steam and wait for the Arma 3 Launcher to appear, then click on Mods on the left menu and check the boxes next to FEMAL3_Heads and Max_Women to activate the mods (if you don’t see them in the list, make sure you subscribed to the mods as per the steps in the Arma 3 & Mods section above). Click the Play with mods button on the bottom-left.
- On Arma’s main screen, click Multiplayer → Quick Play → Host Server (tab on the top), then click the Host Server button. Under Maps click on Altis, then under Missions: click on Antistasi Amazons - Liberation of Altis and on Play on the bottom-right. Antistasi is designed as a multiplayer mission hence this somewhat confusing way to play it single-player on your computer. It does work!
- Click on the green square Independent icon on the left, then click on a role (Default Commander is fine), and on OK on the bottom-right.
- Click Continue on the bottom right and stand by. If it is the first time you play, you will need to pick a starting location for your headquarters by clicking somewhere on the map. The default is fine, but feel free to chose a different place, making sure it is away from roads and enemy locations. (If you have played before, a Load previous session? message will appear. Click Yes.)
- If you like, press M to open the map and click on Briefing and Welcome on the top-left to read a bit about the mission features. You can do this at any time during the game.
Multiplayer
Playing Antistasi missions with friends on a private server is a special multiplayer video game experience. Arma 3’s large maps and realistic land and soundscapes are ideal places for hanging out online, like a digital hike with friends on a camping trip.
You can find a technical friend who has a server somewhere, set one up yourself, or rent your own dedicated one. The server only needs to be configured once by one person (usually the tech-head of the group), and your friends can then join to play together with you.
The following instructions are for setting up a rented server from a very good company called Nodecraft, but if you have nice friends with access to a cloud server somewhere you can also point them to this and this and pester them about setting up a server for you instead and split the costs, like a Roman-style dinner.
-
Go to Nodecraft and click on Arma on the top, then scroll down, add the Megs Plan (3GB RAM, 15 GB SSD, 30 GB backup) to your cart and buy.
-
Create a server instance and get Arma installed.
- Give your instance a name (make up your own).
- Choose
your.nodecraft.hostnameand note it down. - Choose a datacenter location (closest to you and your friends).
- Click Create, then Deploy.
- Hover over the name of your server and click Open.
-
On Nodecraft click on File Manager on the left menu and then click on the
/mpmissions/folder. Upload theAntistasi-Altis-Amazons.Altis.pbo(notice the .pbo) file you downloaded in the Downloads section above into the/mpmissions/folder. On the Nodecraft File Manager click on / to go back to the root directory of the server. -
Download this server configuration file called server.cfg to your computer and edit it to replace the following placeholder text with your server’s details:
- An Arma Server Name chosen by you in:
hostname = "Arma Server Name"; - An arma_server_password chosen by you in:
password = "arma_server_password"; - Your 17-number Steam ID that you can find using https://steamid.co/ in:
admins[] = {"your-17-number-steam-id-here"};
Then upload your edited server.cfg into the root directory of your Nodecraft server using Nodecraft’s File Manager.
- An Arma Server Name chosen by you in:
-
Copy the text in this difficulty.cfg file and paste it into the file at
/share/home/server/server.Arma3Profileon your server, replacing all the existing text. You may need to scroll up in the Nodecraft File Manager interface to see the file, and you may need to create it if it doesn’t exist at that location. -
On the Nodecraft interface click Game Settings on the left menu, then add the following text to the input box under Params:
-config=server.cfgand click Save. -
Start the server by clicking on Start on the top-left.
-
Launch Arma 3 from Steam and wait for the Arma 3 Launcher to appear, then click on Mods on the left menu and check the boxes next to FEMAL3_Heads and Max_Women to activate the mods. If you don’t see them in the list, make sure you subscribed to the mods as per the steps in the Arma 3 & Mods section above. Click the Play with mods button on the bottom-left.
-
In Arma’s main screen, click Multiplayer, then Quick Play, then the Direct Connect tab on the top, and input the following info and click Join:
Address:
your.nodecraft.hostname
Port:2302 -
Click on your chosen
Arma Server Namein the server list (it should have a little key icon next to it), click Join on bottom-right, then type in yourarma_server_passwordand click OK. -
Click on the green square Independent icon on the left, then click on a role (Default Commander is fine), and on OK on the bottom-right.
-
Click Continue on the bottom right and stand by (it may take a while to load the mission, with a Waiting for Players and Server Init message).
If it is the first time you play, you will need to pick a starting location for your headquarters by clicking somewhere on the map. The default is fine, but feel free to chose a different place, making sure it is away from roads and enemy locations. (If you have played before, a Load previous session? message will appear. Click Yes.)
-
If you like, press M to open the map and click on Briefing and Welcome on the top-left to read about the mission features. You can do this at any time during the game.
Congratulations!
You now have a server running that you can jump in to play regularly with your friends in the best digital hang-out spot I know.
The game is complex, the enemy is difficult, and distances are vast, but with friends, time, and some literary AI guerrillas on your side anything is possible!
I won an Antistasi campaign once together with 1 to 6 other friends and it took us a few months of playing two times per week. It was an excellent experience and respite from reality.
Call Your Friends
Once you have your server set up make a copy of these instructions with your own details added in and send them to your friends so they can join you in Altis and help save the world.
Tips
A post with Arma and Antistasi mission tips is forthcoming. For now just know that your mission is automatically saved once per hour, and that in order to save your progress manually in the mission you must:
- Interact with the standing map in the 3D world at your headquarters by looking at it and scrolling the mouse wheel.
- Click on Persistent Save.
On Nodecraft the save file is located at: /share/home/server/server.vars.Arma3Profile. You may want to make a backup copy of this for safe-keeping form time to time by downloading it to your computer.
Feel free to stop the Nodecraft server when you are not using it, but it is not required as the server configuration is set so the mission stops when no one is logged in.
Thanks
- Barbolani and the Antistasi Community Edition Team for making one of the very best Arma missions and game modes.
- Maxjoiner and Zeealex for bringing women avatars to Arma 3.
- Bohemia Interactive for making a wonderful moddable video game (just bring women back in Arma 4, please).
- Respo, Grantalf, Monroe, Vinomaker, Artwo and Spitfit for helping win an Antistasi campaign after many months of play.
· ˖ ✦ . ˳
Come with me in creative journeys through music and play by subscribing to my YouTube and Twitch channels. ❤︎ Did you enjoy this post? You can buy me a moment of time.
Possibly Related:
- Pacing
- Valheim server trouble
- A Tank Comes Looking for Us in the Dark Forests of Arma 3 Antistasi Livonia
- Jordan Mechner's 20 Tips on Making Games (PDF)
- Ignore Plot & Geralt for Witcher 3 Fun
˳ · ˖
Prior entry: Racial Stereotyping in Programming Terms
Next entry: Trouble Man